Sheet Protection
Enable Sheet ProtectionOverview
Audience
Flow of Events
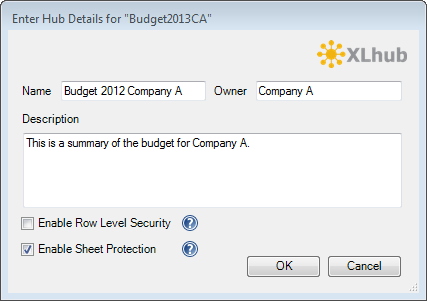
2.When the checkbox is checked, the user will be prompted for the password that will be used for protecting and unprotecting the sheet.
3. Continue creating the hub following the steps outlined in the Create a Hub tutorial.
4. Once the hub is created, the password will be saved in the database along with other hub properties.
5. When you reopen the newly hubbed table in Excel and try to modify the data you will get a warning message.

6. Protection can now be enabled and disabled from Excel’s Review tab using the Protect Sheet/Unprotect Sheet button.

7. During the Retrieve process, XLhub will check to see if the sheet is protected. If the sheet is protected, it will temporarily unprotect it, retrieve the data into the Excel table, and then protect the sheet again.
8. When sharing your hubbed table, only users who have the password can edit data in the hubbed table.
Return to the Create a Hub tutorial to finish creating your hub or see other tutorials and learn all of the ways that XLhub can save you time in your business!
LIVE CHAT

Contact
Phone
248.690.5250
contact@metricx.com
Address
Metric-X, LLC Rochester, Michigan 48307